For some web sites, advertising and informational banners are an integral part of the final design. But sometimes, despite your best efforts at trying to trick the Joomla Module Manager, they just will not display where you want them to. It seems that no combination of module assignments with menu items get the right banner on the right page all of the time. Fortunately there is a solution in a little know but very power feature called Banner Tagging.
The theory behind Banner Tagging is quite simple. Give your banners some sort of tag; look at the meta keywords in the page set by the content being viewed; have the Banners Module marry the two pieces of information together and display the banner. Sounds pretty simple? Well, it is, and it's only a few simple steps to get there.
Step 1 - Set the Tag Prefix
Banner tagging relies on the looking at the keywords inserted into the web page. This could happen when you are looking at a regular Joomla Article or content possibly from an extension you have installed. As long the meta keywords have been set, we are in business. To improve performance, or reduce the risk of the banners getting confused, or both, we can set a prefix that flag to the Banners extension that we are interested in them. To do this, select Components -> Banners from the Administrator Menubar, as shown in the following image.

From the Toolbar, select Parameters. The following image shows the popup dialog box that will appear.
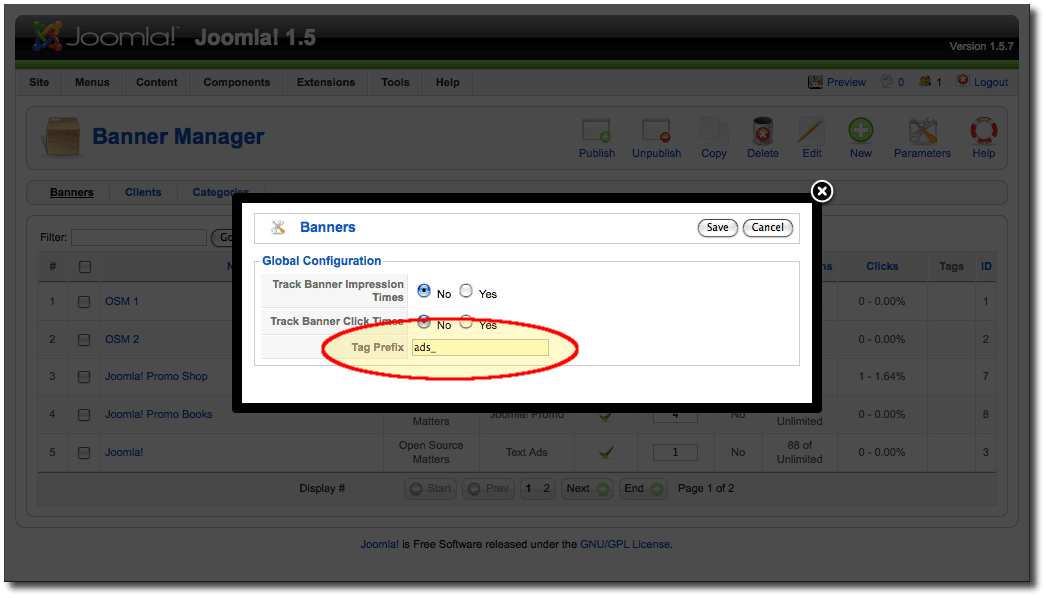
In this example, we are going to use a prefix of "ads_" for all the keywords that we want the Banner extension to be aware of. Type "ads_" in the Tag Prefix field then click Save.
Step 2 - Add Tags to the Banners
Our next step is fairly straight forward. While in the Banner Manager, select one of the banners to edit. The edit form will display similar to what is shown in the following image.
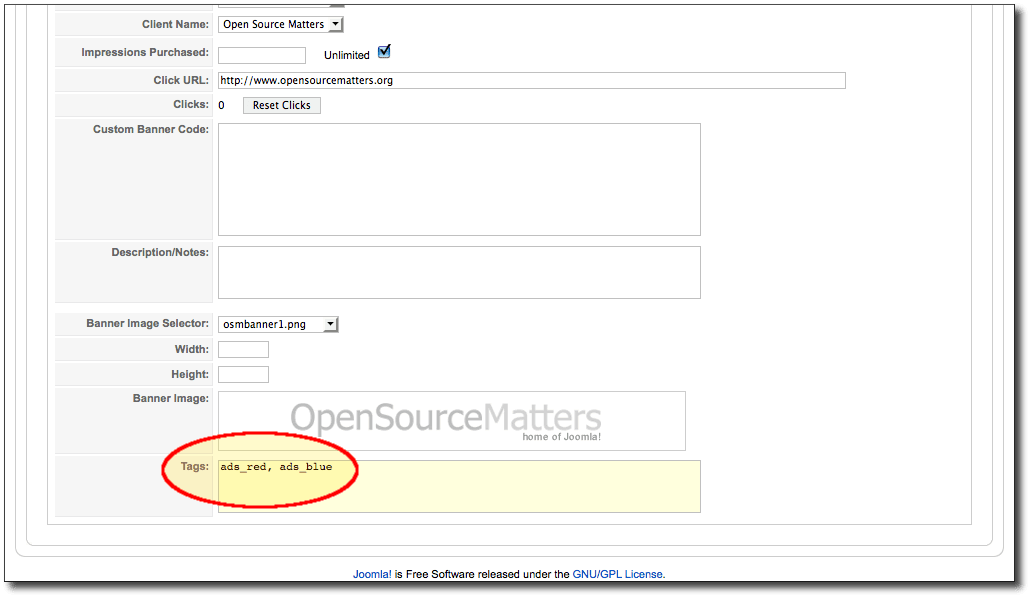
Down the bottom of this form is a field called Tags. In this field we enter a comma separated list (if you are using more than one) of tags, all starting with the Tag Prefix that we set in the Banner Parameters. In the example we've added two tags: "ads_red, ads_blue". The tags can be anything you like as long as they start with the prefix. Save the banner and repeat to other banners as desired.
The tags that you set for each banner will depend on how you want that banner to behave. In the example we just did, the banner will appear on pages that have included keywords of either "ads_red" or "ads_blue" in their keywords list (once we've completed the next few steps).
Step 3 - Adding the Tags to your Content Keywords
The next step is to add the tags that we gave to our banners, to the list of keywords of the content we have created for our web site. The following image shows the Keywords field for a regular Joomla Article.
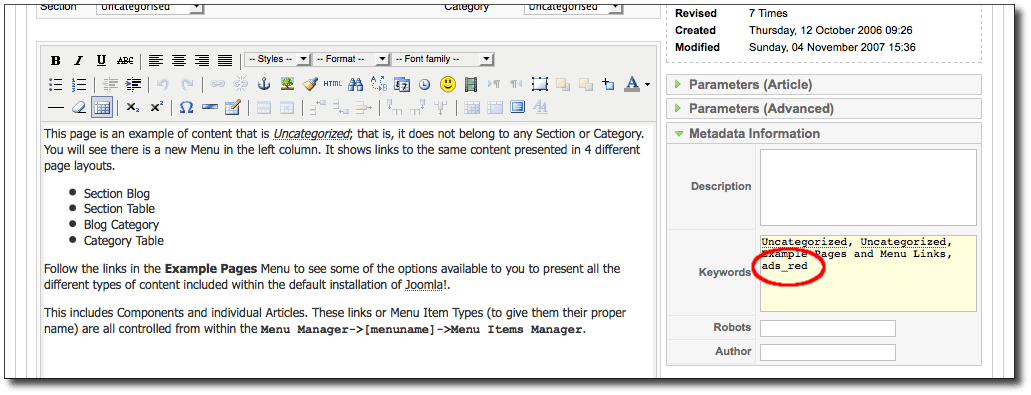
In the Keywords list, we have added "ads_red". This means that if the Banner Module is present when this article is displayed, and tagging is in effect, then the module will be selecting a banner that also has the "ads_red" tag. Because we have set a prefix, it's also going to ignore all the other keywords that have been included for this article, which will give us better performance (that's because we will only lookup one instead of a hlf dozen or more).
One more step to go. Can you feel the anticipation building!
Step 4 - Configure the Banner Module to Use Tags
The last step is to configure the Banner Module to use the tags. To do this, select Extensions -> Module Manager from the Administrator Menubar. Find an existing Banner Module to edit, or create a new one. The edit form will display similar to what is shown in the image below.

You can configure all the other settings normally for the module, but set the Search By Tags option to "Yes" (miss that and all this good work goes pear-shaped). Depending on your site, you may need to display this module on every page (just make sure the module position it is displayed in will collapse gracefully if no banner is displayed). When you are done, save the module.
You have now completed everything you need for the tagged banners to work. To recap, when a visitor to your site visits an article (or other item of content) where one of the keywords of "ads_red", then the Banner Module is going to try to find banners that are tagged with "ads_red" or "ads_blue". If your article has a keyword "ads_blue", the banners that are tagged with "ads_blue" are going to be shown. Because our example banner was tagged with both, it's possible for it to be displayed in different places (because it might be a generic advertisment that applies to a few places and you want it appearing every now and again amonst the really specific advertisements).
Taking is One Step Further
This example shows you how to set your site up to overcome some deficiencies in the Menu and Module management systems to display the right banner on the right page. However, you can also use this system to generate context sensitive advertising. For example, you could give all the banners related to Sports a tag of "ads_sports", and include "ads_sports" in the keywords list for your articles. So in this case, you are not worried about whether the right banner is displayed on the right page with regard to the menu item, but you are wanting Joomla to select banners the match the content that is currently being displayed.
In summary, Banner Tagging is simple to set up yet extremely powerful. It allows you to more closely control the banners that your visitors see and how they relate to either the page they are viewing, or the content they are reading. I hope you enjoy using Banner Tagging on your site when the need arises.
This work is licensed under a Joomla Electronic Document License.